Wednesday, October 4, 2017

Module "ApplicationSuite" has invalid reference to module ...


Hi folks -

While working on a project, I imported an AxModel (D365) that caused me to have the following error when I tried to build the models.


This has to do with a non-existing reference in the new module descriptor file. In my case, in order to solve the problem I went to the AOS Service / PackageLocalDirectory/Application Suite and opened the descriptor file.
 
I opened the file and searched for the "retail" keyword and deleted the line from the file and saved it.


After deleting the line, I refreshed the models.


After that, I build the application again and I was able to keep working on my build.

Thanks folks, I hope this helps.

Monday, September 11, 2017

Common Data Service - Working with Existing Entities


  1. Sing in to https://web.powerapps.com/environments/
  2. If you want to work with an existing environment choose the CDS environment you want to work with. NOTE that Microsoft does not recommend using the default environment. If you need to create a new environment, go to Steps – Create a new CDS Environment.


  1. Click Common Data Service à Entities to see a list of entities in the chosen environment.


  1. Click on the chosen entity to view data, export data, or modify it.


  1. The Open in Excel option will download an Excel file. You can change data directly in the spreadsheet and publish it back to the CDS entity you are working with.
  2. The Export Data option will download a CSV file along with XML documents.
  3. The Import Data option will give you the ability to import data via CSV. Just keep in mind that the column mapping must be the same as the one you can download.
  4. You can view the data directly in the CDS entity by clicking the Data tab.

  1. Once you have made changes to the chosen entity, you can choose to create or work with an existing project. Please see the  Working with new Projects if you want to create a new one, or Working with existing Projects if you want to modify an existing project.
  2. You may choose to create new entities for the different customizations done to either Sales or Operations. To create a new entity follow  Working with a new CDS Entity.


Common Data Service - D365 for Operations and Sales CDM Integration Setup and Concepts


The following set of posts will discuss the setup, and integration concepts for the Common Data Service. I do want to provide my gratitude to Tribridge for allowing me to be part of a project where the Common Data Service was needed.

In case, you the reader, don't know about the Common Data Service,  in a nutshell "The Common Data Service is the Microsoft Azure–based business application platform that enables you to easily build and extend applications with their business data. The Common Data Service does the heavy lifting of bringing together your data from across the Dynamics 365 family of services so you can focus on building and delivering the apps, insights and process automation that matter to you and your customers with PowerApps, Power BI, and Microsoft Flow."


The content will be divided in small posts, which be accessible from the links below. Please see of the preliminary information we gathered while setting up the environments needed for this project.

Prerequisites

In order to create new Power Apps CDS projects the following is needed:

  1. Global Admin role in an Office 365 tenant where Dynamics 365 for Operations and Dynamics 365 for Sales. 
  2. KB4036524 - This hotfix enables sales order line synchronization with the Data Integration feature from Finance and Operations to Sales..
  3. KB4036461 - This hotfix enables sales order synchronization with the Data Integration feature from Finance and Operations to Sales.
  4. Prospect to cash solution for Dynamics 365 for Sales, version 1.14.0.0 (v14) or later. (https://mbs.microsoft.com/customersource/Global/365Enterprise/downloads/product-releases/MD365FNOPENTProspectToCash). (Done for D365 for Sales Customer Engagement).
  5. Microsoft Dynamics 365 for Finance and Operations, Enterprise edition July 2017 update with Platform update 8 (App 7.2.11792.56024 w/ Platform 7.0.4565.16212). Support for App 7.1 will be added with a hotfix.
  6. Dynamics 365 Sales, Enterprise Edition. The integration solution is compatible with Microsoft Dynamics 365 Customer Engagement Version 1612 (8.2.1.207) (DB 8.2.1.207) online.
  7. An environment in the Common Data Service. The environment must have a database for integration and you must be an environment administrator for that database.


Solution Flow

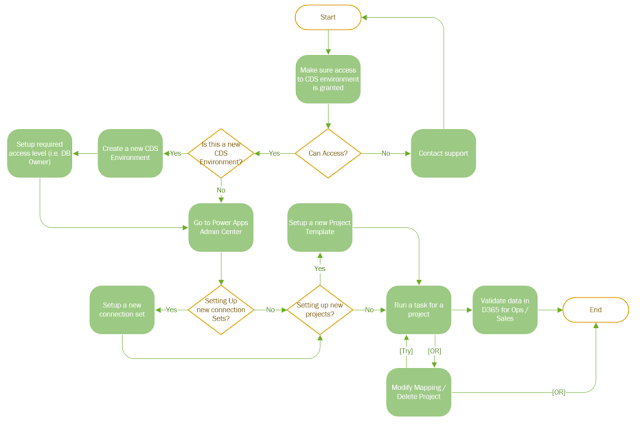
The following is our vision of the entire process (at a very high-level).


Content Links

The following links contain the information we gathered to work with existing environments and entities, environment, connection sets and Projects creation, among others.

Create a new CDS Environment

Create a new Power Apps (CDS) Project

Working with Existing Power Apps (CDS) Projects

Working with Existing CDS Entities

Working with Existing Projects/Tasks Mapping


That's all for now. I'll be adding interesting articles on how to setup each project in CDS.


Common Data Service - Working with Existing Power Apps Projects


  • From the below screen you will be able to (1) modify a task map, (2) Schedule project (Continuous auto-execution), and (3) look at the Execution History (This is where you will be able to see errors/warning if they happen).
  • To modify a task map see Working with existing project/task mappings.
  • To create a recurring schedule, click on Scheduling and click the Recur Every radio button. Choose a time frame, a start date, and end date if applicable.


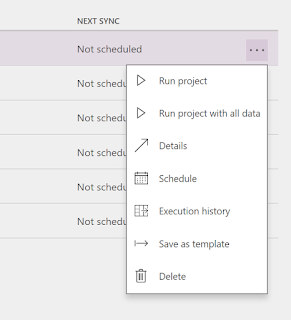
  • To run a project, you can do so from (1) the Scheduling tab, Execution History tab, or (3) from the project list (Click the … button and choose run project).
 
  • To examine a status (Complete/Error/Warning), go to the Execution history either by going into the Project and then clicking the Execution History tab, or by simply the … button and choosing Execution History.


Common Data Service - Create a new CDS Environment


  • From there go to Admin Center, and choose Power Apps.


  • If you want to create a New CDS Environment click Environments à New Environment.
 
 
  • The New Environment form will come up. Add an environment name and set the Region.


  • Click Create environment. This process can take a while. Please note that the new CDS Environment process will create a new CDS Database for you and it is created with sample data. Also, keep in mind that the creation of a new environment uses defaults for the CDS Organization (ORG0001), and it will use the default CRM price list used in both the Products and Sales Order integration templates.
  • If you need to add a new organization, the Organization entity must be updated. To do so, access this link (https://docs.microsoft.com/en-us/common-data-service/entity-reference/dynamics-365-integration) and go to the Preparing the Common Data Service section and follow the instructions on how to update the Organization ID. You will see something like the below:


Common Data Service - Working with Existing Projects/Tasks Mapping


  • Click in the project name to access its tasks, and then click on a task (i.e. SalesInvoiceHeader).


  • There are two mapping sections.
    • Source to CDS – i.e. Sales Orders Template, which will move data from D365 for Ops to CDS, and then from CDS to D365 for Sales. The transformations (see below for more info) are done at this stage. This means that if there is data to be transformed from D365 for Ops to D365 for Sales, it will be transformed at the time that is written into CDS, this is done to avoid having two transformations from CDS to Destination.
    • CDS to Destination – The CDS contains the data already transformed and ready to be push to the target system without major data manipulation. Note that the data in CDS can be used to integrate with external systems.
 
 
  • You can create JSON transformations for your data by using the Edit Transformation function. You have 4 choices:
    • Default: Where the Source to CDS explicitly sets a default value to be always the same i.e. ORG001.
    • Truncate: A fixed length i.e. Notes.
    • Value Map: Transforms data from source to system. i.e. Unit of Measure for “Pieces” in D365 for Ops is “pcs”, and in D365 for Sales is “Piece”.
    • Country Region Code: Related to a picklist in CDS for pre-defined mapping of countries.
    • See about mappings and projects in posts stating with Common Data Service Project Setup.

Common Data Service - Create a new Power Apps Project


  • To create a new Power App Project go here https://admin.powerapps.com/dataintegration/
  • In order to create a new Project, you will need to create a new Connection Set (use to authenticate each environment - CDS, Operations, Sales or Customer Engagement). Please note that once you have created a new connection set with the chosen CDS environment, this can be used for other projects as well.
  • Click Data Integration and then New Project.


  • The New Data Integration Project wizards appears. At this point you will be able to provide a Project Name.


  • Select a template. The available templates for Order to Cash are provided by Microsoft, and they provide the integration to move data between D365 for Operations and D365 for Sales, or vice versa. Or, an integration to only move data from the system of record to the CDS. For example, the templates Accounts (Sales to CDS), and Sales Quotes (Sales to CDS) are a good example of a system of record to CDS integration. NOTE: You don’t have to work with the out-of-the-box templates, you can create your own.
  • Click Next, and then choose your connection set.


  • Choose your Organizations. This data comes from connection set configuration.


  • Finally confirm the project. Once confirmed, you will see your new project under the Projects tabs. To modify, run, schedule, and delete existing projects, please see Steps – Work with existing projects.
  • Once the project is created, you will be able to work on the mappings. For example, you might want to add a new UOM in CRM to comply with the requirements of the Product CDS integration template. For this, you will have to modify existing mappings. For more information see Steps – Working with existing project/task mappings.


Monday, August 28, 2017

RESTful Services - Dealing with REST vs WCF


Hi folks -

With the advent of the new changes around the Common Data Service (CDS), there are new concepts to be learned as Microsoft Dynamics AX Architects/Developers. If you would like to learn more about this, please go to https://powerapps.microsoft.com/en-us/guided-learning/learning-common-data-service/

The purpose of this post is to provide a simple basic understanding of what REST is, its rules, and a simple example on how it differs from WCF, which has been the main service layer in Dynamics AX  2012.

Moving on, in recent years, it has become clear that HTTP is not just for serving up HTML/HTML5 pages. It is also a powerful platform for building Web APIs (D365 for Ops is a good example) using a handful of verbs (GET, POST, and so forth) plus a few simple concepts such as URIs and headers.

Additionally there are six guiding constraints that define a RESTful system, these constraints restrict the ways that the server may process and respond to client requests so that, by operating within these constraints, the service gains desirable non-functional properties, such as performance, scalability, simplicity, modifiability, visibility, portability, and reliability. If a service violates any of the required constraints, it cannot be considered RESTful.

REST constraints

Client-server architecture

The first constraints added to the hybrid style are those of the client-server architectural style. The principle behind the client-server constraints is the separation of concerns. Separating the user interface concerns from the data storage concerns improves the portability of the user interface across multiple platforms. It also improves scalability by simplifying the server components.

Stateless protocol

The client–server communication is constrained by no client context being stored on the server between requests. Each request from any client contains all the information necessary to service the request, and session state is held in the client. The session state can be transferred by the server to another service such as a database to maintain a persistent state for a period and allow authentication. The client begins sending requests when it is ready to make the transition to a new state. While one or more requests are outstanding, the client is considered to be in transition. The representation of each application state contains links that may be used the next time the client chooses to initiate a new state-transition.

Cacheability

Clients and intermediaries can cache responses. Responses must therefore, implicitly or explicitly, define themselves as cacheable or not to prevent clients from reusing stale or inappropriate data in response to further requests. Well-managed caching partially or completely eliminates some client–server interactions, further improving scalability and performance.

Layered system

A client cannot ordinarily tell whether it is connected directly to the end server, or to an intermediary along the way. Intermediary servers may improve system scalability by enabling load balancing and by providing shared caches. They may also enforce security policies.

Code on demand

Servers can temporarily extend or customize the functionality of a client by transferring executable code. Examples of this may include compiled components such as  client-side scripts such as JavaScript.

Uniform interface

The uniform interface constraint is fundamental to the design of any REST service. It simplifies and decouples the architecture, which enables each part to evolve independently. The four constraints for this uniform interface are:

Resource identification in requests

Individual resources are identified in requests, for example using URIs in Web-based REST systems. The resources themselves are conceptually separate from the representations that are returned to the client. For example, the server may send data from its database as HTML, XML or JSON, none of which are the server's internal representation. A good example of this can be seeing in power apps when creating JSON mappings.

The above is important to understand as when creating RESTful services to interact with our power apps or flow, these constraints will help us to create a true MVC pattern (using MS tools) so we can take advantage of scalability, reusability, and smart data management. Let's look at a simple comparison between WCF and REST.  

Services - WCF/REST

Unlike WCF where a service is an address to a physical file (i.e. an address that maps directly to a service class or .svc file), Service addresses with MVC are REST-style routes that map to controller methods - they fit nicely with REST-API Specs.

Let's look at an example of a Task Management routine with WCF:

[Service Contract]

public interface ITaskService
{
[Operation Contract]

Task GetTask(long Task ID);
}

public class TaskService : ITaskService
{

private readolny IRepository _repository;

Public TaskService(IRepository repository)

{
_repository = repository;
}

Public Task GetTask(long taskId)

{
        Return _repository.Get<Task>(taskId);
}
}

The resulting service for the above WCF service will look like this: http://MyServer?TaskService.svc

The below code achieves the same result than the above one. The only difference is that is built with MVC4 and it also is JavaScript friendly (JavaScript meaning for any web based app). The main difference is that the below code would involve creating a controller instead of a service class. Further, the method that takes care of retrieving the TaskId exist in the controller itself, unlike WCF where it would be defined by a contract.

Public class TaskController : Controller
{

private readolny IRepository _repository;

Public TaskController(IRepository repository)
{
_repository = repository;
}

Public ActionResult Get(long taskId)
{
Return JSON(_repository.Get<Task>(taskId));
}
}

In order to retrieve a single task - the MVC4 will not need SOAP, or any service class to contract with along with an operation. The call will look like this (assuming there is an appropriately  configured route.


Let's move further, and look an example with the ApiController. The URL will look different as the above example contains the Get in the URL. The ApiController base class was built to enable RESTful services, and by using it we would only need to return the object(s) in a collection and the data related to that collection.

Public class TaskController : ApiController
{
private readolny IRepository _repository;
Public TaskController(IRepository repository)
{
_repository = repository;
}

Public Task Get(long taskId)
{
Return repository.Get<Task>(taskId));
}
}


The URL will look like this http://MyServer/Task/001


If we note, in the address above we don't include the method name (i.e. Get) like we did in the example where we were using the Controller base class instead of the ApiController one. The amazing reason for this is because when using the ApiController base class, it automatically maps to the corresponding controller methods, therefore it helps us to create API the flows more naturally with the REST architecture.
 
Thanks all for now!